Check File System For Errors
Check Disk is a tool used to verify file system integrity and is also used to locate bad sectors of hard drives. It also helps in recovering corrupted data whenever a system failure occurs that involves data integrity (i.e. power failure). Below are steps in Windows for operating Check Disk.- Open Windows explorer and right click on the drive you want to perform Check Disk. Then select properties option to launch the properties window.
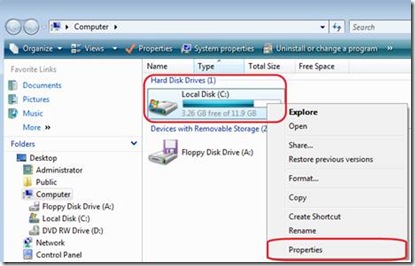
- In the properties window click on Tools and under Error checking click on Check Now button.

- In the Check Disk option box select both opinions and click Start to start the checking process.

- In Some cases Check Disk cannot start because the disk you want to check is still being used by the system. So to be able to check your disk errors click on Schedule disk check on the pop up window. Doing this Check Disk will run on dos mode after you restart your system. Do not press any key after you restarts so that Check Disk will continue to run. Wait for the process to finish. The whole thing could take up to an hour depending on your hard disk capacity.

- You can also use the Check Disk tool on the Command Prompt. To do this click on start and type CMD on the search bar and press enter to launch the command prompt of windows.
- In the command prompt window type CHKDSK /? and press To see the lists of command line parameters for CHKDSK.

- You will see here the parameters and the function of each parameter. The syntax of the command is also shown.
- In most cases it is enough to use the /F or /R parameters to check the disk for any errors. Example of using the command prompt to use Check Disk : type on the command prompt CHKDSK C: /F - this command will check the disk C: using the parameter /F which means fix errors on the disk specified. Or CHKDSK C: /R which will locate bad sectors and recover readable information and also fix errors on disk C.
Defrag hard disk volume
In older file system architectures, if a file could not be stored
contiguously, it could not be saved to the disk. Newer architectures
intentionally divide files into multiple pieces so as to make more
efficient use of disk storage space.
Since files are constantly being written, deleted, and resized,
fragmentation is a natural and ongoing occurrence. However, it is also
one that has significant performance implications. When a file is
spread out over several locations, it takes longer to read and write.
In fact, the effects of fragmentation can be more widespread than
that, causing long boot times, random crashes and system freeze-ups.
Defragmentation is a time-consuming process, the more so the greater
the extent of fragmentation. It is therefore important to terminate
any programs, including those running in the background like firewalls
and anti-virus programs – before starting the defragmentation
process. Failure to do so will mean that it is constantly interrupted,
adversely impacting the time the process takes possibly to the extent
of it failing to complete.
The following describes how to defragment your hard drive using
Windows XP’s disk defragmentation program, which is a free built in
component of the operating system.
Note that you cannot defragment a hard disk that is completely full,
and that the less free space there is, the longer defragmentation will
take. This is because the defragmentation utility need some room in
which to temporarily store fragments as it reassemble files.
If your hard disk is relatively full, it is therefore good practice to run Disk Cleanup before attempting to defragment a drive.
Launch the Defragmenter Tool, either via..

Start > Programs > Accessories > System Tools...
or by double clicking My Computer, right clicking and hard disk drive, clicking Properties..

....and selecting to Tools tab.
The resulting display will list your hard disk drives, showing the capacity and amount of free space for each.

Select the drive you want to defragment and click Analyse.
The drive is scanned and a visual representation of the degree to which it is fragmented display.

Depending on the results of the analysis, you will be advised as to whether of not the volume should be defragmented.

Even if it's not strictly necessary, you can choose to Defragment.
The length of time the defragmentation takes will depend on the size of the drive, the degree to which it's fragmented and the amount of free space it has. Be prepared to allow it to run for several hours, if necessary.
The dialogue box will indicate when the process is complete...

...and give a visual representation of the now defragmented drive.

Click View Report...

....to see a defragmentation report
While some people address the issue of the time it takes to run defragmentation by scheduling it to be run overnight, others choose to ensure that it is not interrupted by other programs by running it in a completely clean environment, either by carrying out the process either following a clean boot or with Windows in Safe Mode.
No comments:
Post a Comment