Sunday, May 20, 2012
My video about Technology around us
Now this is my video about the technology around us. Hope you enjoy my simple video which is starring the eggs ehehe..
Friday, May 18, 2012
Our experience during class activities


Thursday, May 17, 2012
Hardware Maintenance on the 14th April 2012


1. 2 Philips Screwdriver
2. 1/4 Flat Screwdriver
3. 1 Philips Screwdriver
4. 3/16 Flat Screwdriver
5. 0 Philips Screwdriver
6. 1/8 Flat Screwdriver

Functions on the tools of 7,8, and 9 is almost the same which is for tightening nuts and bolts the difference is the sizes of the tools. Function for the tool no. 10 are to heat solder, which is a mixture of metals with a low melting point which the molten metal is allowed to flow around, for example, two pieces of copper. the solder, bonds the pieces together when it cools or in other words it is used to bond two copper wire together.
7. Reversible Torque Screwdriver
8. 3/16 Nut Driver
9. 1/4 Nut Driver
10. Soldering Iron

11. 8 Wire Cutter (Multi Stripper Crimper tool)
12. IC Extractor
13. Reverse Action Tweezers
14. Tweezers
16. Three Claw Parts
17. 5" Needle Nose Pliers

Function of the 8 wire cutter is to cut wire and to strip the wire from its cover and crimps insulated and non-insulated wire.
Function of IC Extractor is to extract the chip from the motherboard.
Function of the Reverse Action Tweezers is for youto hold items that you are gluing into place. Function of the Tweezers is used for picking up and manipulating objects too small to be easily handled with the human hand. Function of the IC Inserter is used to insert a DIP chip into a circuit board. Function of the Three Claw Parts is used to grab or retrieve any small items such as screw. Functions of the 5" Needle Nose Pliers are grips, twists, cuts, crimps and crushes.

Wednesday, May 16, 2012
First class activity which is disassembling the PC(Desktop)

First thing you have to do is to unscrew the screw in order
to open the computer case.

Once you done unscrew then slide the case to open.

In this picture shows you what it is like in the computer or
in the desktop where here you can see the motherboard, cooling fans, wires
connected into each of the hardware such as the DVD-ROM, Hard Disk and the
motherboard. The wires are usually comes from the power supply and some of it
is usually used to connect it into the hardware available. Some of the hardware
doesn’t need a wire to connect, for example the wireless adapter which it just
need to be plugged in into the motherboard. The power supply is the main power
in the computer where it gives current in order to make all the hardware to
function and the CPU is the brain of the computer which it gives an order for
the computer to works.

In this picture shows you on how to open the cooling fan for
the CPU. Which is first, you have to unscrew to open the cooling fan. Once all
the screw is removed then make sure to unplug the wire which is connected into
the motherboard in order to take out from the motherboard.

This is how the cooling fan for the CPU or the Central
Processing Unit looks like.

In this picture shows you on how to open the RAM where first
you have to open the notches at both the end of the RAM. The notches are the
white things in the picture which is at the end of the RAM where it lock the
RAM from being remove but once the notches is open then the RAM will be easily
to remove. Make sure you remove the RAM gently in order not to damage the RAM.

This is how the RAM looks like usually there are two types
of ram which is SIMM and DIMM for this computer I’m not sure but I think the
computer use DIMM type of RAM.

In this picture show you on how to remove the hard disk. First
you have to disconnect the SATA data cable and the SATA power cable in order to
remove the hard disk from the computer bracket.

After done with disconnecting the cable from the hard disk
or hard drive, next is to unscrew the screw that attached the hard disk to the
bracket in order to remove the hard disk from the bracket. Then pull it gently
from the bracket.

This is how the hard disk looks like, according from the
information I’ve got from the internet this is the new type of hard disk that the
desktop nowadays are using which it used the SATA cables to connect into the
motherboard and the power supply where the old hard disk are using the ATA
cables.

In order to open the floppy disk drive and the DVD-ROM first
you have to open the front cover. Once the front cover is opened then you can
proceed to open the floppy disk drive and the DVD-ROM.

To open the floppy disk drive first you have to unplug the
wires that attached to the floppy disk drive. This includes a wire power and
one for the EIDE interface. If there is nothing else plugged into these wires,
they can be unplugged from the motherboard and removed altogether. Not forget
to unscrew any screw that may be holding the floppy disk drive in the drive
bay. Once all the screw is remove then gently slide the floppy disk drive out
of its bay via the front side of the desktop.

This is how the floppy disk drive looks like, since an
external hard disk or a flash drive has been made currently this floppy disk
drive is no longer being use so nowadays the new desktop usually are build with
more USB slot instead of using the floppy disk drive.

Next is to open the DVD-ROM, first you have to unplug the
wires that attached to the DVD-ROM which the wires are SATA power cable and
SATA data cable. Once the cables are removed, next is to unscrew any screw that
may be holding the DVD-ROM then gently slide the DVD-ROM out from the computer.

This is how the DVD-ROM looks like once it is being removed
from the computer.

Next is to remove the cooling fan from the computer case,
first is to unscrew it from the case then it will be easily removed from the
computer case not forget to unplug the wire from the motherboard. The function
of this fan is to reduce the heat inside the computer.

This picture will show you how to unplug the wireless
adapter from the motherboard which first you have to remove the antenna first
in order to unplug the wireless adapter from the motherboard. To remove the
antenna you have to twist it anti-clockwise direction then it will be remove. Next
is to pull the wireless adapter card from the motherboard gently.

This is how the wireless adapter looks like. It is called
Wireless PCI Adapter which is produce by the TRENDnet.

Lastly, this picture shows you to unplug the CMOS battery. Function of
this CMOS battery is to keep track the time during your computer is being
switched off.
Safety Precautions

Before start
disassembling the computer there are a few warnings and reminders that
we should follow in order to keep the computer and yourself safe.
- Fully shutdown and unplug the computer before you make any attempts to disassemble the computer.
- Take off any metal objects on your arms or fingers such as bracelets, rings or watches. Even if your computer is unplugged, there may still be some remaining electric charge.
- Make sure your hands are completely dry to avoid damaging any mechanical parts as well as to avoid any electrocution.
- Prepare to place any screws you may remove. A container or piece of paper with labels for each part (casing, motherboard, CD drive, etc) is deal to avoid any confusion between the similar- looking screws.
- If a component does not come out easily, do not forcefully remove it. Instead, check that you are removing it correctly and that no wires or other parts are in the way.
- Be careful not to drop any small parts into unreachable area such as into the computer fan or disk drive.

Tuesday, May 15, 2012
PC Preventive Maintenance

PC
preventive maintenance refers to carrying out measures to prevent problems from
occurring, in contrast to corrective maintenance, which seeks to solve an
already existing problem. In the long run, preventive maintenance saves time
and money, protects your data, improves computer performance, and prolongs
computer life. These are accomplished by considering and planning for the risks
involved in working with computers (e.g. data loss, hardware failures).
The
other meaning of Preventive maintenance is an equipment maintenance strategy
based on replacing, overhauling or re-manufacturing an item at a fixed interval,
regardless of its condition at the time. Scheduled Restoration tasks and
Scheduled Discard tasks are both examples of preventive maintenance tasks. Preventive
maintenance has to be distinguished from corrective maintenance or condition
based maintenance.
Perform Windows Computer Preventive Maintenance.
Fixing your own computer is less necessary if you perform computer maintenance. These tips for maintaining your PC can help you prevent computer problems before they happen and can keep your computer running smoothly and efficiently.
Be aware of hygiene and updates
- keep your computer cool and dry. Avoid direct sunlight on all computer components. Don't block fan and ventilation openings. Be careful with food and drink around the machine; a spill can ruin a machine in seconds.
- Keep your computer clean. Wipe the monitor, keyboard, and computer case periodically with soft sloth. keep handy a soft, clean paintbrush or a can of compressed air to clean out the keyboard and ventilation ports on the computer case and monitor. You can also gently vacuum the parts.
- Keep your software up to date. Microsoft regularly updates Windows. Other software manufacturers keep their applications current with updates, too. Check manufacturer Web sites.
- Cooling fan. the computer's coding cooling fan should make only a soft whir, but some machines automatically speed up the fan when temperatures start to rise. Is the computer in direct sunlight? Have you inadvertently restricted airflow in and out of the box? Is the power supply overheating?
- Hard Drive. A louder-than-usual hard drive may mean an impending failure; listen for clicks or erratic speedups and slowdowns. Back up your data and run diagnostic programs provided by the hard drive manufacturer or your computer maker.
- Lag time. Notice how long it takes to launch a program or retrieve data. if things start taking unusually long, you may be seeing a hard drive about to fail, or it just may be cluttered. Run diagnostics and use a de-fragmentation utility. Also, keep an eye out for error messages or alerts
Monday, May 14, 2012
The Top Three PC System Utilities Software
PC System Utilities Software is a system software designed to help analyze, configure, optimize or maintain a computer. A single piece of utility software is usually called a utility or tool. Utility software usually focuses on how the computer infrastructure (including the computer hardware, operating system, application software and data storage) operates. Due to this focus, utilities are often rather technical and targeted at people with an advanced level of computer knowledge in contrast to application software, which allows users to do things like creating text documents, playing games, listening to music or viewing websites. For more information based in the PC system utilities software please visit to http://pc-system-utilities-software-review.toptenreviews.com/

The top three PC system utilities software are:-

ADVANCED SYSTEM OPTIMIZER 3.1
Advanced System Optimizer is one of the best PC system utilities on the market today. It excels at maintaining the performance of your system by repairing errors in the registry and on your hard drive, protecting your system and privacy, and optimizing sluggish system processes, we appreciate that this application that has an easy-to-use interface which is loaded with features that are both user-friendly and extremely functional. If your computer is having problems, Advanced System Optimizer likely has the tool that can fix it.
 WINZIP SYSTEM UTILITIES SUITEThe WinZip System Utilities Suite provides the tools you need to have a faster and better performing computer. The WinZip System Utilities Suite offers the tools to diagnose and repair most problems and offers excellent optimization features to ensure that your computer is healthy and running at its best. This PC system utilities software also provides a simple to use interface that even those who do not have years of computer experience will be able master.
-
SYSTEM MECHANIC PROFESSIONAL 10
 System Mechanic from iolo has a larger feature set than any of the other PC system utilities. Unfortunately, not all these features are easy to use. While System Mechanic allows its users to attack problems using several different versions of the same features, we found their maintenance and diagnostics functions to be overly complicated. The other features in System Mechanic are universally understandable and can solve a number of issues that may cripple your computer's performance. Despite a few challenging features, System Mechanic is one of the best PC system utilities around.


Sunday, May 13, 2012
Indentify some of the functions of various types of software for preventive maintenance
Check File System For Errors
Check Disk is a tool used to verify file system integrity and is also used to locate bad sectors of hard drives. It also helps in recovering corrupted data whenever a system failure occurs that involves data integrity (i.e. power failure). Below are steps in Windows for operating Check Disk.- Open Windows explorer and right click on the drive you want to perform Check Disk. Then select properties option to launch the properties window.
- In the properties window click on Tools and under Error checking click on Check Now button.

- In the Check Disk option box select both opinions and click Start to start the checking process.

- In Some cases Check Disk cannot start because the disk you want to check is still being used by the system. So to be able to check your disk errors click on Schedule disk check on the pop up window. Doing this Check Disk will run on dos mode after you restart your system. Do not press any key after you restarts so that Check Disk will continue to run. Wait for the process to finish. The whole thing could take up to an hour depending on your hard disk capacity.

- You can also use the Check Disk tool on the Command Prompt. To do this click on start and type CMD on the search bar and press enter to launch the command prompt of windows.
- In the command prompt window type CHKDSK /? and press To see the lists of command line parameters for CHKDSK.

- You will see here the parameters and the function of each parameter. The syntax of the command is also shown.
- In most cases it is enough to use the /F or /R parameters to check the disk for any errors. Example of using the command prompt to use Check Disk : type on the command prompt CHKDSK C: /F - this command will check the disk C: using the parameter /F which means fix errors on the disk specified. Or CHKDSK C: /R which will locate bad sectors and recover readable information and also fix errors on disk C.
Defrag hard disk volume
In older file system architectures, if a file could not be stored
contiguously, it could not be saved to the disk. Newer architectures
intentionally divide files into multiple pieces so as to make more
efficient use of disk storage space.
Since files are constantly being written, deleted, and resized,
fragmentation is a natural and ongoing occurrence. However, it is also
one that has significant performance implications. When a file is
spread out over several locations, it takes longer to read and write.
In fact, the effects of fragmentation can be more widespread than
that, causing long boot times, random crashes and system freeze-ups.
Defragmentation is a time-consuming process, the more so the greater
the extent of fragmentation. It is therefore important to terminate
any programs, including those running in the background like firewalls
and anti-virus programs – before starting the defragmentation
process. Failure to do so will mean that it is constantly interrupted,
adversely impacting the time the process takes possibly to the extent
of it failing to complete.
The following describes how to defragment your hard drive using
Windows XP’s disk defragmentation program, which is a free built in
component of the operating system.
Note that you cannot defragment a hard disk that is completely full,
and that the less free space there is, the longer defragmentation will
take. This is because the defragmentation utility need some room in
which to temporarily store fragments as it reassemble files.
If your hard disk is relatively full, it is therefore good practice to run Disk Cleanup before attempting to defragment a drive.
Launch the Defragmenter Tool, either via..

Start > Programs > Accessories > System Tools...
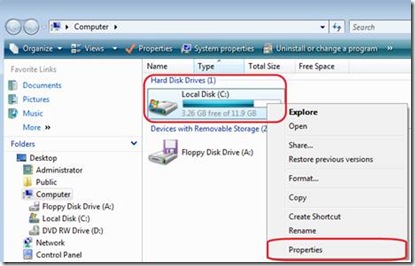
or by double clicking My Computer, right clicking and hard disk drive, clicking Properties..

....and selecting to Tools tab.
The resulting display will list your hard disk drives, showing the capacity and amount of free space for each.

Select the drive you want to defragment and click Analyse.
The drive is scanned and a visual representation of the degree to which it is fragmented display.

Depending on the results of the analysis, you will be advised as to whether of not the volume should be defragmented.

Even if it's not strictly necessary, you can choose to Defragment.
The length of time the defragmentation takes will depend on the size of the drive, the degree to which it's fragmented and the amount of free space it has. Be prepared to allow it to run for several hours, if necessary.
The dialogue box will indicate when the process is complete...

...and give a visual representation of the now defragmented drive.

Click View Report...

....to see a defragmentation report
While some people address the issue of the time it takes to run defragmentation by scheduling it to be run overnight, others choose to ensure that it is not interrupted by other programs by running it in a completely clean environment, either by carrying out the process either following a clean boot or with Windows in Safe Mode.
Saturday, May 12, 2012
What would happen to the world if there's NO technology

- It will be hard for a country to developed without technology.
- Without technology communication also will be difficult for an organization.
- There will be no entertainment for us.
- Any good news from other country will be hard to broadcast to the peoples in different countries.
- Any natural disaster also will be hard to measure without technology for example an earthquake, we need seismograph to measure the earthquake so without this tools or technology people would die without knowing if there's an earthquake.
- World will be real dark at night without a lamp in the city.
- People will be living like a stone age.
- Production of foods also will be slow such as rice without the machines that we were using nowadays the growth of the rice will be decreasing and people will start to be starving of food.
- Medicals also will be really difficult for people without technology.
- Life also could be bored without technology.
- Even Iron Man also will be extinct from the movies (just kidding =p)
Subscribe to:
Comments (Atom)