First thing you have to do is to unscrew the screw in order
to open the computer case.
Once you done unscrew then slide the case to open.
In this picture shows you what it is like in the computer or
in the desktop where here you can see the motherboard, cooling fans, wires
connected into each of the hardware such as the DVD-ROM, Hard Disk and the
motherboard. The wires are usually comes from the power supply and some of it
is usually used to connect it into the hardware available. Some of the hardware
doesn’t need a wire to connect, for example the wireless adapter which it just
need to be plugged in into the motherboard. The power supply is the main power
in the computer where it gives current in order to make all the hardware to
function and the CPU is the brain of the computer which it gives an order for
the computer to works.
In this picture shows you on how to open the cooling fan for
the CPU. Which is first, you have to unscrew to open the cooling fan. Once all
the screw is removed then make sure to unplug the wire which is connected into
the motherboard in order to take out from the motherboard.
This is how the cooling fan for the CPU or the Central
Processing Unit looks like.
In this picture shows you on how to open the RAM where first
you have to open the notches at both the end of the RAM. The notches are the
white things in the picture which is at the end of the RAM where it lock the
RAM from being remove but once the notches is open then the RAM will be easily
to remove. Make sure you remove the RAM gently in order not to damage the RAM.
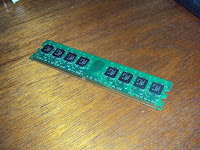
This is how the RAM looks like usually there are two types
of ram which is SIMM and DIMM for this computer I’m not sure but I think the
computer use DIMM type of RAM.
In this picture show you on how to remove the hard disk. First
you have to disconnect the SATA data cable and the SATA power cable in order to
remove the hard disk from the computer bracket.
After done with disconnecting the cable from the hard disk
or hard drive, next is to unscrew the screw that attached the hard disk to the
bracket in order to remove the hard disk from the bracket. Then pull it gently
from the bracket.
This is how the hard disk looks like, according from the
information I’ve got from the internet this is the new type of hard disk that the
desktop nowadays are using which it used the SATA cables to connect into the
motherboard and the power supply where the old hard disk are using the ATA
cables.
In order to open the floppy disk drive and the DVD-ROM first
you have to open the front cover. Once the front cover is opened then you can
proceed to open the floppy disk drive and the DVD-ROM.
To open the floppy disk drive first you have to unplug the
wires that attached to the floppy disk drive. This includes a wire power and
one for the EIDE interface. If there is nothing else plugged into these wires,
they can be unplugged from the motherboard and removed altogether. Not forget
to unscrew any screw that may be holding the floppy disk drive in the drive
bay. Once all the screw is remove then gently slide the floppy disk drive out
of its bay via the front side of the desktop.
This is how the floppy disk drive looks like, since an
external hard disk or a flash drive has been made currently this floppy disk
drive is no longer being use so nowadays the new desktop usually are build with
more USB slot instead of using the floppy disk drive.
Next is to open the DVD-ROM, first you have to unplug the
wires that attached to the DVD-ROM which the wires are SATA power cable and
SATA data cable. Once the cables are removed, next is to unscrew any screw that
may be holding the DVD-ROM then gently slide the DVD-ROM out from the computer.
This is how the DVD-ROM looks like once it is being removed
from the computer.
Next is to remove the cooling fan from the computer case,
first is to unscrew it from the case then it will be easily removed from the
computer case not forget to unplug the wire from the motherboard. The function
of this fan is to reduce the heat inside the computer.
This picture will show you how to unplug the wireless
adapter from the motherboard which first you have to remove the antenna first
in order to unplug the wireless adapter from the motherboard. To remove the
antenna you have to twist it anti-clockwise direction then it will be remove. Next
is to pull the wireless adapter card from the motherboard gently.
This is how the wireless adapter looks like. It is called
Wireless PCI Adapter which is produce by the TRENDnet.
Lastly, this picture shows you to unplug the CMOS battery. Function of
this CMOS battery is to keep track the time during your computer is being
switched off.


No comments:
Post a Comment